Python Instrument Panel(2)Arduinoスケッチ
2017/10/17 追記:スケッチを変更しやすいように変更しました。
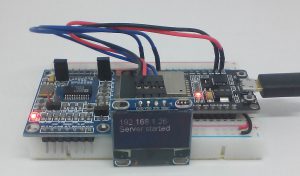
2018/06/09 追記:ESP-32用のスケッチでOLEDモジュールにIPアドレスを表示するようにしました。OLEDモジュールを接続しなくてもスケッチを変更する必要はありません。
「GUI Maker for ESP8266 & ESP32 – Python Inst. Panel」のGoogle Playの説明にArduinoスケッチを貼り付けたのですが、インデントがなくなってしまうのでこちらにも貼り付けておきます。
この説明の最後に貼ってあるArduinoスケッチを、ESP8266かESP-WROOM-32に書き込んでください。
アプリ画面のIP addressをESPのIPアドレスに変更して接続ボタンを押し、ボタン、スライダー等を操作するとアプリ画面のログに表示される内容と同じものが、Arduino IDEのシリアルモニタに表示されます。


実際に使用するときは、Arduinoスケッチの最後の部分に独自の処理を追加します。

String process(String str) {
  Serial.println(str);
  //if (str == "Button1: Button1")
  //  return "Received!";
  return "";
}

アプリ側も、各Button、InputField、SliderのScriptに処理を追加します。Script言語はIron Pythonです。

Button用のDefault script:
msg = 'Button%d: %s' % (sender.Index, sender.Text)
print msg
if Remote.Writer != None:
	Remote.Writer.WriteLine(msg)
	Remote.Writer.Flush()

InputField用のDefault script:
msg = 'InputField%d: %s' % (sender.Index, text)
print msg
if Remote.Writer != None:
	Remote.Writer.WriteLine(msg)
	Remote.Writer.Flush()

Slider用のDefault script:
msg = 'Slider%d: %f' % (sender.Index, value)
print msg
if Remote.Writer != None:
	Remote.Writer.WriteLine(msg)
	Remote.Writer.Flush()

ESPからデータを取得する場合は、次のようにします。

	Remote.Writer.WriteLine(msg)
	Remote.Writer.Flush()
	print Remote.Reader.ReadLine()

InputFieldのスクリプトはTextプロパティの現在の内容を text で参照できます。
SliderのスクリプトはValueプロパティの現在の内容を value で参照できます。
スクリプトを呼び出したボタン、スライダー等のプロパティは、sender.X 等で参照・設定できます。他の部品は、Items[インデックス番号].X 等で参照・設定できます。

  X:(int)左端からの距離
  Y:(int)上端からの距離(下向きはマイナス)
  W:(int)部品の幅
  H:(int)部品の高さ
  Text:(string)Button、InputField、Textの表示文字列
  FontSize:(int)Button、InputField、Textのフォントサイズ
  F:(16進文字列RGBA)Textの文字色
  B:(16進文字列RGBA)Textの背景色
  Value:(float)Sliderの値(0~1)
  Interval:(float)Sliderのリピート間隔(秒)
まずは、ESP-WROOM-32用のサンプルスケッチです。OLEDモジュールを追加しています。
#include <WiFi.h>
#include <Wire.h>
#include "SSD1306Wire.h"

/* Set these to your desired credentials. */
//const char *ssid = "ESPap";
//const char *password = "thereisnospoon";

const char* ssid     = "your-ssid";
const char* password = "your-password";

WiFiServer server(2002);
WiFiClient client;

void mySetup();
void myLoop();
String process(String str);

SSD1306Wire display(0x3c, 21, 22);

void setup() {
  Serial.begin(57600);

  mySetup();

//  Serial.println();
//  Serial.print("Configuring access point...");
//  /* You can remove the password parameter if you want the AP to be open. */
//  WiFi.mode(WIFI_AP);
//  WiFi.softAP(ssid, password);
//  IPAddress myIP = WiFi.softAPIP();
//  Serial.print("AP IP address: ");
//  Serial.println(myIP);

  Serial.println();
  Serial.print("Connecting to ");
  Serial.println(ssid);
  //WiFi.mode(WIFI_STA);  // Disable Access Point
  WiFi.begin(ssid, password);
  while (WiFi.status() != WL_CONNECTED) {
    delay(500);
    Serial.print(".");
  }
  Serial.println("");
  Serial.println("WiFi connected");
  Serial.println("IP address: ");
  Serial.println(WiFi.localIP());
  server.begin();
  Serial.println("Server started");

  display.init();
  display.flipScreenVertically();
  display.setFont(ArialMT_Plain_16);
  display.drawString(0, 0, WiFi.localIP().toString());
  display.drawString(0, 16, "Server started");
  display.display();
}

void loop() {
  myLoop();

  if (!client.connected()) {
    // try to connect to a new client
    client = server.available();
  } else {
    // read data from the connected client
    if (client.available()) {
      String inputString = client.readStringUntil('\n');
      inputString.trim();
      String outputString = process(inputString);
      if (outputString != "") {
        client.println(outputString);
      }
    }
  }
}

void mySetup() {

}

void myLoop() {

}

String process(String str) {
  Serial.println(str);
  //if (str == "Button1: Button1")
  //  return "Received!";
  return "";
}
次は、ESP8266用のサンプルスケッチです。OLEDモジュールは追加していません。
#include <ESP8266WiFi.h>
#include <WiFiClient.h>

/* Set these to your desired credentials. */
//const char *ssid = "ESPap";
//const char *password = "thereisnospoon";

const char* ssid     = "your-ssid";
const char* password = "your-password";

WiFiServer server(2002);
WiFiClient client;

void mySetup();
void myLoop();
String process(String str);

void setup() {
  Serial.begin(57600);

  mySetup();

//  Serial.println();
//  Serial.print("Configuring access point...");
//  /* You can remove the password parameter if you want the AP to be open. */
//  WiFi.mode(WIFI_AP);
//  WiFi.softAP(ssid, password);
//  IPAddress myIP = WiFi.softAPIP();
//  Serial.print("AP IP address: ");
//  Serial.println(myIP);

  Serial.println();
  Serial.print("Connecting to ");
  Serial.println(ssid);
  //WiFi.mode(WIFI_STA);  // Disable Access Point
  WiFi.begin(ssid, password);
  while (WiFi.status() != WL_CONNECTED) {
    delay(500);
    Serial.print(".");
  }
  Serial.println("");
  Serial.println("WiFi connected");
  Serial.println("IP address: ");
  Serial.println(WiFi.localIP());

  server.begin();
  Serial.println("Server started");
}

void loop() {
  myLoop();

  if (!client.connected()) {
    // try to connect to a new client
    client = server.available();
  } else {
    // read data from the connected client
    if (client.available()) {
      String inputString = client.readStringUntil('\n');
      inputString.trim();
      String outputString = process(inputString);
      if (outputString != "") {
        client.println(outputString);
      }
    }
  }
}

void mySetup() {

}

void myLoop() {

}

String process(String str) {
  Serial.println(str);
  //if (str == "Button1: Button1")
  //  return "Received!";
  return "";
}