FPGA SPI Bridge Panel(1)Arduinoスケッチ
2018/08/05 追記:OLEDモジュールを接続しない場合は、SSD1306Wire.h関連のコードを削除したスケッチを使ってください。
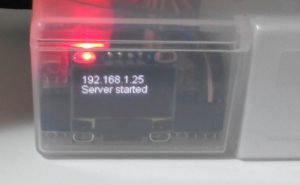
2018/06/09 追記:OLEDモジュールにIPアドレスを表示するようにしました。OLEDモジュールを接続しなくてもスケッチを変更する必要はありません。
Google Playに「GUI Maker for Avalon Bus – FPGA SPI Bridge Panel」を公開しました。
「GUI Maker for ESP8266 & ESP32 – Python Inst. Panel」に「FPGA SPI Bridge Console for Avalon Bus」の機能を追加したものです。アンドロイド端末からFPGAを操作するGUIを短時間で作成できます。
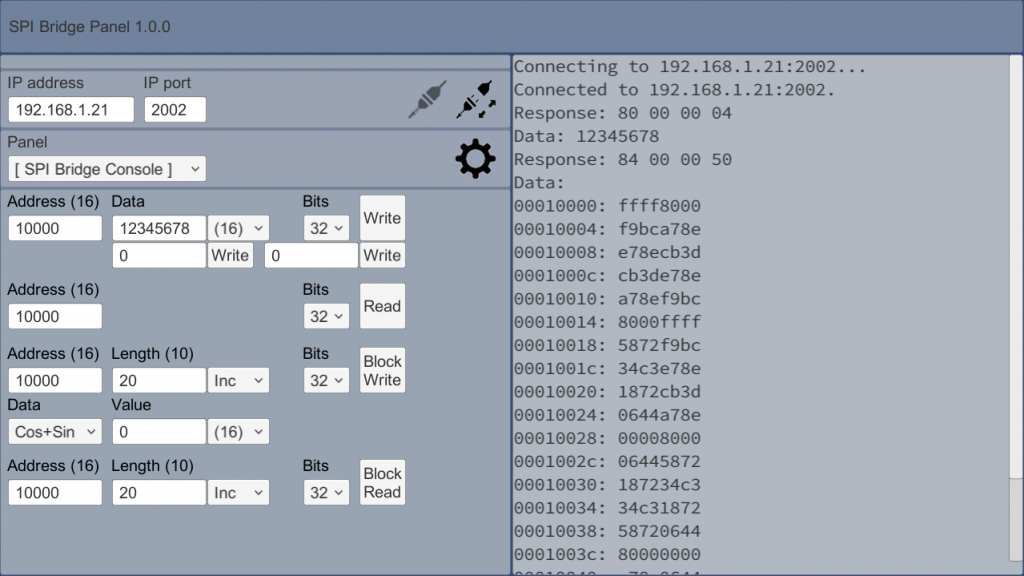
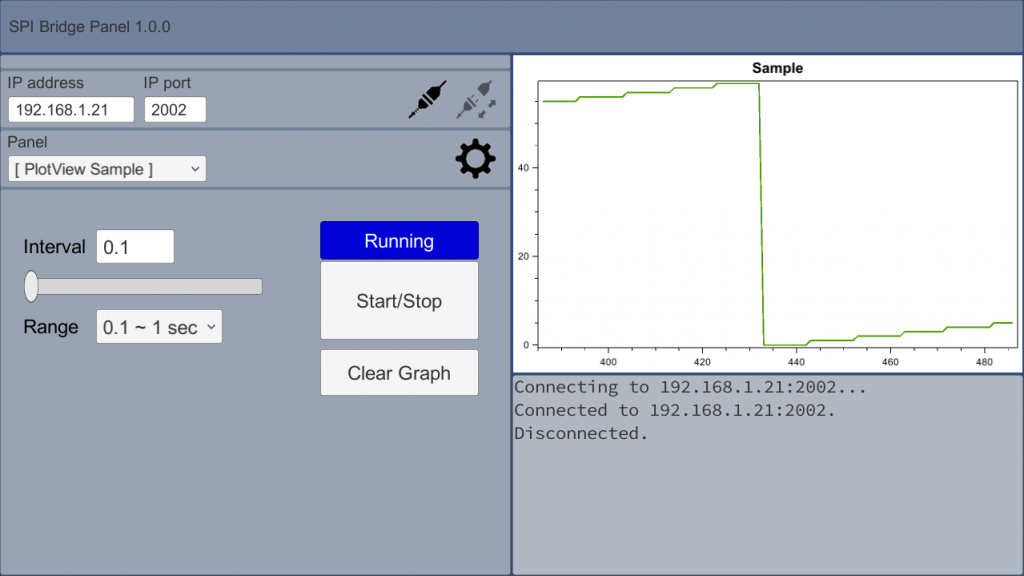
「GUI Maker for ESP8266 & ESP32 – Python Inst. Panel」と同様にグラフ付きのGUIも作れます。
Google Playの説明文をこちらにも載せておきます。
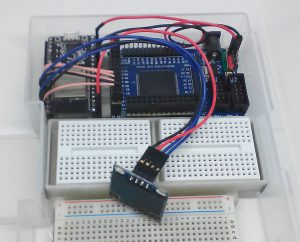
Qsysのオンライン・マニュアル「Embedded Peripheral IP User Guide」の「SPI Slave/JTAG to Avalon Master Bridge Cores」に書かれているように、JTAG以外にSPIでも外部からFPGA内部を操作できます。
Arduino、Raspberry PiなどからSPI経由でFPGAに実装した回路をアクセスできるのです。Nios II CPUを組み込まなくてもいいんです。
例えば、ESP-WROOM-32をWifiーSPI変換器として使えばアンドロイド端末からWifi経由でFPGAを操作できてしまいます。

  アンドロイド端末 →(Wifi)→ ESP-WROOM-32 →(SPI)→ FPGA


このアプリは「Python Inst. Panel - GUI maker for ESP8266 & ESP32」と同様に、ボタン、タイマー、グラフ等を貼り付けて処理をPythonで記述することで、FPGA用の操作パネルを簡単に作ることができます。
GUI関連は「Python Inst. Panel - GUI maker for ESP8266 & ESP32」の説明文とこのアプリに入っている「SPI Bridge Console」と「PlotView Sample」のPythonスクリプトを見てください。
Pythonスクリプトの中で次のメソッドを使ってFPGA内のAvalonバスをアクセスします。

byte[] WriteBytePacket(UInt32 addr, byte data, int timeoutInSec)
byte[] WriteUInt16Packet(UInt32 addr, UInt16 data, int timeoutInSec)
byte[] WriteUInt32Packet(UInt32 addr, UInt32 data, int timeoutInSec)
byte[] WriteBytePacket(UInt32 addr, byte[] dataBytes, bool isIncremental, int timeoutInSec)
byte[] WriteUInt16Packet(UInt32 addr, UInt16[] dataArray, bool isIncremental, int timeoutInSec)
byte[] WriteUInt32Packet(UInt32 addr, UInt32[] dataArray, bool isIncremental, int timeoutInSec)
byte ReadBytePacket(UInt32 addr, int timeoutInSec)
UInt16 ReadUInt16Packet(UInt32 addr, int timeoutInSec)
UInt32 ReadUInt32Packet(UInt32 addr, int timeoutInSec)
byte[] ReadBytePacket(UInt16 size, UInt32 addr, bool isIncremental, int timeoutInSec)
UInt16[] ReadUInt16Packet(UInt16 size, UInt32 addr, bool isIncremental, int timeoutInSec)
UInt32[] ReadUInt32Packet(UInt16 size, UInt32 addr, bool isIncremental, int timeoutInSec)
以下は、ESP-WROOM-32用のOLEDありのスケッチです。
#include <SPI.h>
#include <WiFi.h>
#include <Wire.h>
#include "SSD1306Wire.h"

/* Set these to your desired credentials. */
//const char *ssid = "ESPap";
//const char *password = "thereisnospoon";

const char* ssid     = "your-ssid";
const char* password = "your-password";

WiFiServer server(2002);
WiFiClient client;

#define SPI_BUF_LEN 1024
byte spiBuf[SPI_BUF_LEN];
byte spiReadBuf[SPI_BUF_LEN];

SSD1306Wire display(0x3c, 21, 22);

void setup() {
  Serial.begin(57600);

  SPI.begin();
  SPI.setFrequency(24000000);
  SPI.setDataMode(SPI_MODE1);
  SPI.setBitOrder(MSBFIRST);
  pinMode(SS, OUTPUT);
  digitalWrite(SS, HIGH);

//  Serial.println();
//  Serial.print("Configuring access point...");
//  /* You can remove the password parameter if you want the AP to be open. */
//  WiFi.mode(WIFI_AP);
//  WiFi.softAP(ssid, password);
//  IPAddress myIP = WiFi.softAPIP();
//  Serial.print("AP IP address: ");
//  Serial.println(myIP);

  Serial.println();
  Serial.print("Connecting to ");
  Serial.println(ssid);
  //WiFi.mode(WIFI_STA);  // Disable Access Point
  WiFi.begin(ssid, password);
  while (WiFi.status() != WL_CONNECTED) {
    delay(500);
    Serial.print(".");
  }
  Serial.println("");
  Serial.println("WiFi connected");
  Serial.println("IP address: ");
  Serial.println(WiFi.localIP());
  server.begin();
  Serial.println("Server started");

  display.init();
  display.flipScreenVertically();
  display.setFont(ArialMT_Plain_16);
  display.drawString(0, 0, WiFi.localIP().toString());
  display.drawString(0, 16, "Server started");
  display.display();
}

void loop() {
  if (!client.connected()) {
    // try to connect to a new client
    client = server.available();
  } else {
    // read data from the connected client
    int n = client.available();
    if (n > 0) {
      //Serial.print("available: ");
      //Serial.println(n);
      if (n > SPI_BUF_LEN) {
        n = SPI_BUF_LEN;
      }

      // transfer data to/from SPI
      client.readBytes(spiBuf, n);
      digitalWrite(SS, LOW);
      SPI.transferBytes(spiBuf, spiReadBuf, n);
      digitalWrite(SS, HIGH);

      // return data to client
      client.write(spiReadBuf, n);
    }
  }
}
以下は、ESP-WROOM-32用のOLED無しのスケッチです。
#include <SPI.h>
#include <WiFi.h>
#include <Wire.h>

/* Set these to your desired credentials. */
//const char *ssid = "ESPap";
//const char *password = "thereisnospoon";

const char* ssid     = "106F3F28087C_G";
const char* password = "xr84vyms434wt";

WiFiServer server(2002);
WiFiClient client;

#define SPI_BUF_LEN 1024
byte spiBuf[SPI_BUF_LEN];
byte spiReadBuf[SPI_BUF_LEN];

void printBytes(byte *bytes, int bytesSize);

void setup() {
  Serial.begin(57600);

  SPI.begin();
  SPI.setFrequency(24000000);
  SPI.setDataMode(SPI_MODE1);
  SPI.setBitOrder(MSBFIRST);
  pinMode(SS, OUTPUT);
  digitalWrite(SS, HIGH);

//  Serial.println();
//  Serial.print("Configuring access point...");
//  /* You can remove the password parameter if you want the AP to be open. */
//  WiFi.mode(WIFI_AP);
//  WiFi.softAP(ssid, password);
//  IPAddress myIP = WiFi.softAPIP();
//  Serial.print("AP IP address: ");
//  Serial.println(myIP);

  Serial.println();
  Serial.print("Connecting to ");
  Serial.println(ssid);
  //WiFi.mode(WIFI_STA);  // Disable Access Point
  WiFi.begin(ssid, password);
  while (WiFi.status() != WL_CONNECTED) {
    delay(500);
    Serial.print(".");
  }
  Serial.println("");
  Serial.println("WiFi connected");
  Serial.println("IP address: ");
  Serial.println(WiFi.localIP());
  server.begin();
  Serial.println("Server started");
}

void loop() {
  if (!client.connected()) {
    // try to connect to a new client
    client = server.available();
  } else {
    // read data from the connected client
    int n = client.available();
    if (n > 0) {
      //Serial.print("available: ");
      //Serial.println(n);
      if (n > SPI_BUF_LEN) {
        n = SPI_BUF_LEN;
      }

      // transfer data to/from SPI
      client.readBytes(spiBuf, n);
      //printBytes(spiBuf, n);
      digitalWrite(SS, LOW);
      SPI.transferBytes(spiBuf, spiReadBuf, n);
      digitalWrite(SS, HIGH);

      // return data to client
      //printBytes(spiReadBuf, n);
      client.write(spiReadBuf, n);
    }
  }
}

void printBytes(byte *bytes, int bytesSize) {
  Serial.println();
  for (int i = 0; i < bytesSize; i++) {
    Serial.print(bytes[i], HEX);
    Serial.print(" ");
  }
}